Your Cart is Empty
All Orders arrive within 1-2 days
- Mobility
- Physical Therapy
- Home Care
- Bathroom Safety
- Supports
- Daily Aids
- Foot Care
- Health Devices
- Injury
- Best Savings
- Blogs
- 1-800-487-3808
- Business
- Login

Learning how to tape or splint a sprained finger is one of the most effective ways to promote long-term healing. As this injury is so common, finding the right techniques for supporting your injured finger is a must. Keep reading to learn more about how to tape or splint a sprained finger.
When ligaments are overstretched and result in a sprain, they typically require a period of rest for healing. Movement can be painful, cause further injury, or aggravate swelling initially. Bracing can help prevent unnecessary use of the finger; which can be difficult since we are so used to using our hands all day, every day. Here are just a few of the benefits of finger bracing with tape or a splint:
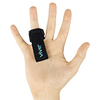
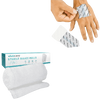
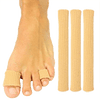
Buddy taping is a great way to offer additional support to a sprained finger, with a simple process anyone can learn.
Buddy taping is a simple solution for mild to moderate finger sprains. When symptoms are manageable and there is no big concern or visible deformity in the finger, you can safely try taping the finger at home.
Here is a quick run-through of the process required for buddy taping a finger.
Here are some quick tips for using the buddy tape technique to your advantage:
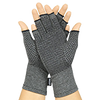
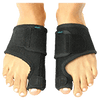
Splints are a more restrictive option that are most beneficial for moderate (or potentially even severe) cases of a finger sprain. Learn more about finger splinting here.
Splints are meant to completely restrict finger motion to allow more rest and reduce inflammation and pain. Your doctor may prescribe one or you can pick up a standard adjustable one at a pharmacy. Alternatively, if you have a specific finger dysfunction that needs to be addressed you might be referred to a hand specialist for a custom made splint.
Using a finger splint is pretty straightforward if you keep these steps in mind:
How often you will need to wear your splint depends on the extent of damage to your finger. With moderate injuries, 5-7 days of continuous wear will probably do the trick. However, it may be recommended to take your finger out of the splint for short periods of time throughout the day to maintain skin health and allow gentle finger range of motion to prevent excessive stiffness.
The balance of rest and movement is a delicate one, so you can work with a physical therapist or pay close attention to your symptoms as a guide. For moderate sprains, try taking your splint off at least 3 times per day for 10-20 minutes. For more severe sprains, you may keep it on continuously (even for sleep) if instability is a concern. With time, you may find you only need to wear the splint with more advanced movements of the hand and then transition to no use at all within 3-6 weeks.
Anytime movement is restricted at a joint, there is a risk of excessive stiffness and loss of strength and coordination. Additionally, splints or tape can leave the skin feeling vulnerable, so keep an eye out for sores from excessive pressure, poor circulation due to too tight of taping, or even infection if it is left unmanaged.
If you don’t start to notice positive improvements in symptoms in 1-2 weeks, consider discussing your options with your doctor. You may need a round of physical therapy or have other injuries ruled out like a finger fracture with further assessment.
If your fingers are feeling stiff or weak, try a few finger exercises to keep them working right.
Finger splinting and buddy taping are great solutions for supporting a healing finger injury. As long as you pay attention to your skin health, your symptoms should gradually improve with time until you can start returning to some form of normal hand and finger function. If you are unsure during the healing process or experience an aggravation of symptoms, you should talk to your doctor as soon as possible to prevent complications.
Sources:
https://www.verywellhealth.com/how-to-buddy-tape-a-finger-1298212


![The Benefits of Flexibility [A.K.A. The Secret Sauce for Aging]](http://www.vivehealth.com/cdn/shop/articles/Smiling-retired-woman-listening-to-music-while-stretching-legs-outdoors._600x.jpg?v=1713090677)

Let's Live Better ®
free Shipping Over $39
100% Satisfaction Guarantee
Lowest Price Guarantee
This site is protected by reCAPTCHA and the Google Privacy Policy and Terms of Service apply.
© 2024 Vive Health. All rights reserved.